Data Acquisition
WILD Console is the main operator interface for BLE connection, synchronization support, recording configuration, selected live preview, closed-loop control, and SD-card export.
WILD is a local-storage neurologger. High-bandwidth neural and multimodal data are written to the device microSD card. BLE supports setup, timing calibration, status messages, command delivery, and selected preview signals.
The current public workflow uses WILD Console on Windows. Full-resolution recordings are recovered from the microSD card.
The WILD device does not need continuous full-bandwidth wireless streaming to preserve the recording. Keep BLE connected when the session needs online preview, parameter changes, or live commands. Otherwise, use BLE for setup and timing coordination, then recover the full dataset from the microSD card.
First-session scope
For the first dry run, use only the minimum path needed to connect, record, stop, and export. Leave closed-loop, camera, stimulation, GPIO, and advanced parameter panels unchanged until the basic local-storage workflow is confirmed.
Recording Prerequisites
Before starting a recording that will use PC-side timestamps, USB-GPIO triggers, camera triggers, behavior events, or multi-device alignment:
- Disable Windows automatic time setting and automatic time-zone changes.
- Run
TimeCalibratoron the acquisition computer. - Keep the TimeCalibrator record with the WILD export.
- Use the calibration record after export to correct PC-to-WILD time offset and drift.
WILD and the PC use independent clocks. Windows automatic time management does not calibrate PC drift against the WILD device clock, and an automatic correction can introduce an abrupt shift between PC time and WILD logger time during a recording.
First-Pass Button Path
For a basic dry run, only a small part of WILD Console is needed. The closed-loop, camera, stimulation, GPIO, and advanced parameter panels can stay unchanged until the device connects, synchronizes, records, and exports reliably.
The online and live figures below are runtime screenshots from WILD Console during hardware sessions. Some window-title or device-list strings may still show older internal labels; the public documentation uses the WILD name consistently.
Connect to the device. Work in the Online tab for BLE discovery, synchronization, preview, and recording control.
Find nearby WILD devices. If the device is not listed, rescan after confirming power, battery, and BLE status.
Select the target logger. The selected row updates device information, available space, and connection state.
Open the BLE session. Wait for device-state and synchronization labels before starting a recording.
Start local logging. Full-resolution data are written to the device microSD card, not streamed continuously over BLE.
Close the recording cleanly. Stop before removing power or taking out the microSD card.
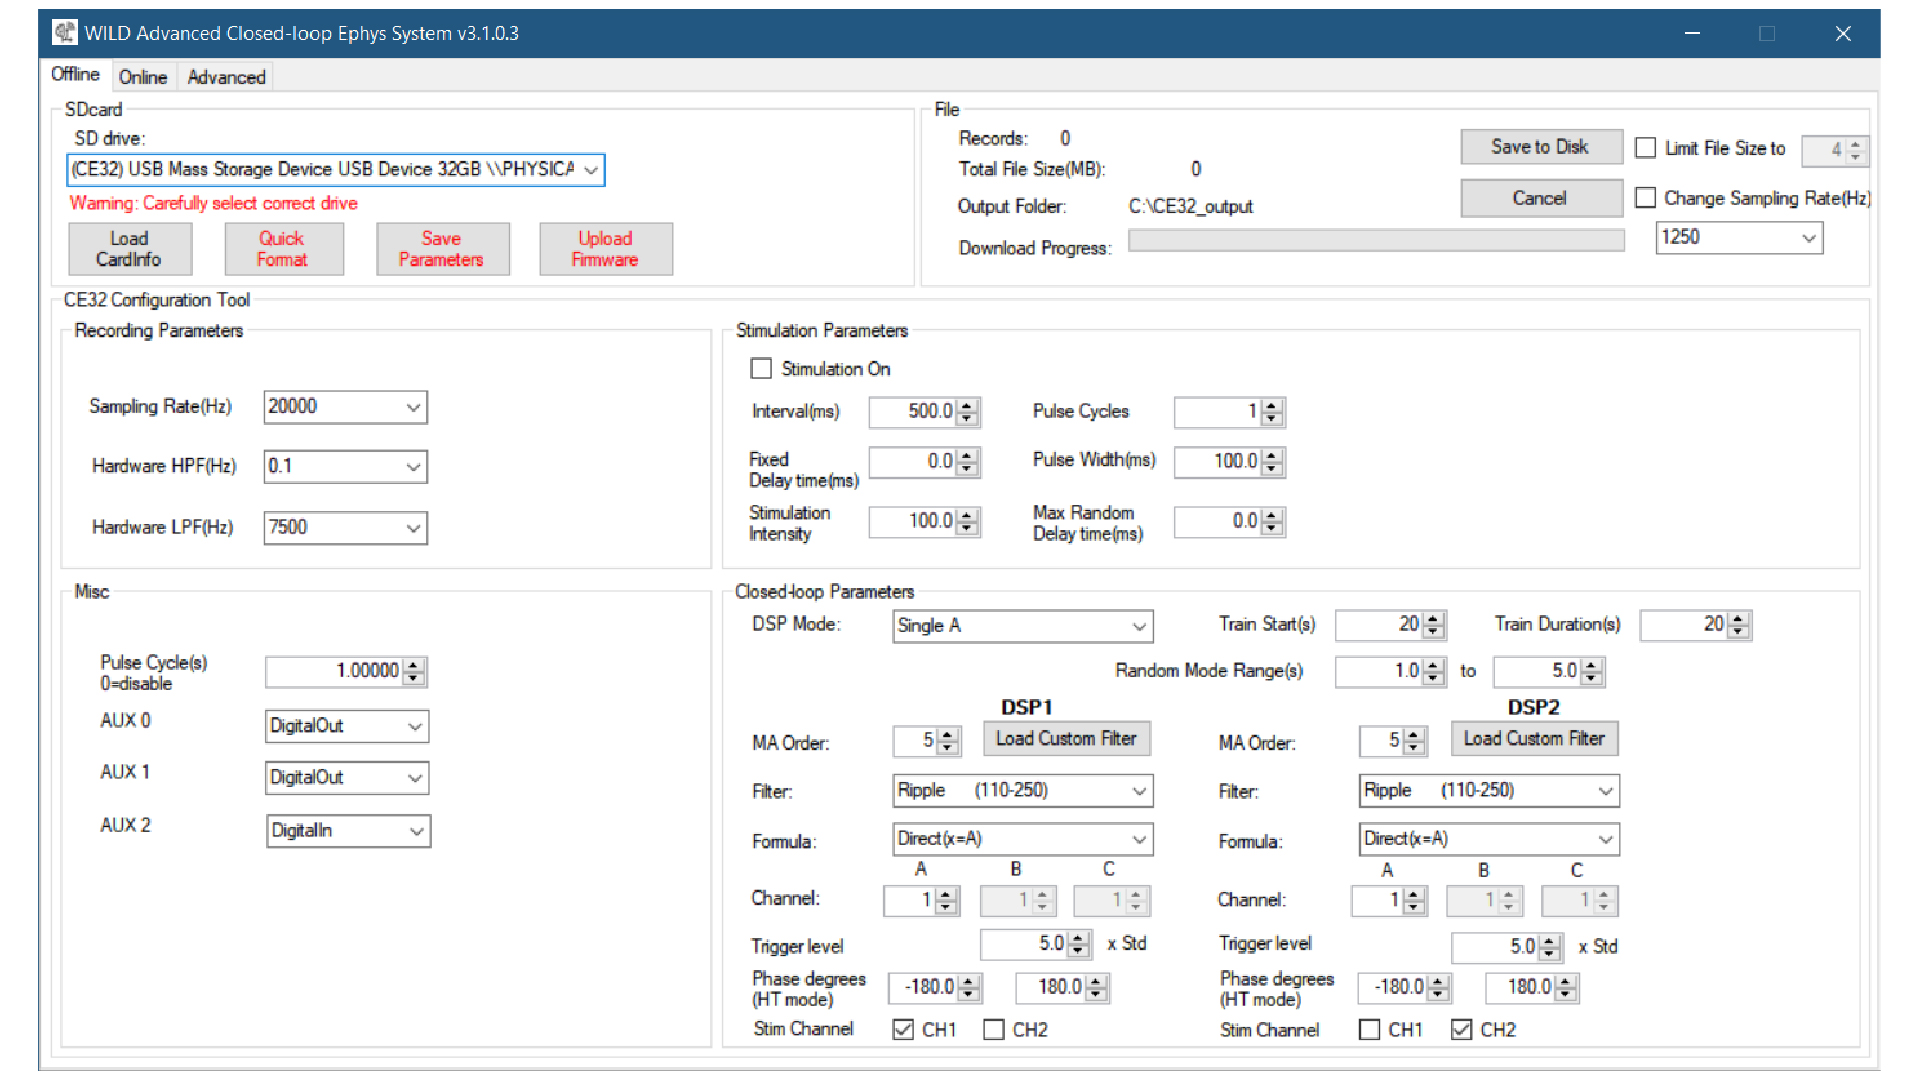
Move to export after recording. Insert the microSD card into the PC and use the Offline tab for SD-card download.
Export the recording folder. WILD Console decodes the SD-card recording into public analysis files.
First-session rule: ignore , , , and parameter panels until a simple recording can be started, stopped, and exported.
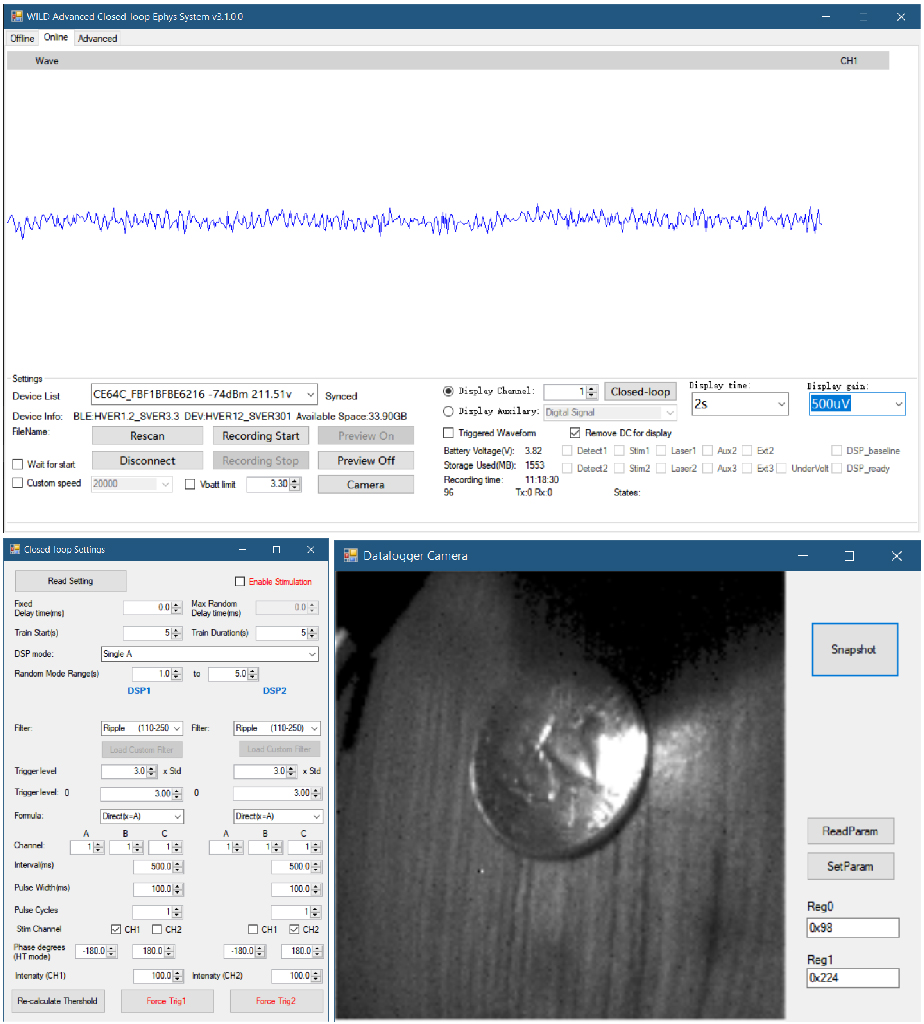
Connect
- Launch
WILD Console_EXE_PLACEHOLDER. - Click if the device is not listed.
- Select the WILD device from .
- Click and wait for device-state and synchronization updates.
- Confirm that the TX/RX indicators update. If BLE connects but synchronization does not start, check the microSD card and timing setup first.
Expected signs of success
- The device appears in the list after rescan.
- The selected row updates device information.
- Connect succeeds without repeated disconnect loops.
- Status labels move past discovery into an active connected state.
Record
- Confirm the expected sampling speed and channel count.
- Leave closed-loop and camera settings unchanged unless the experiment needs them.
- Use
Wait for startonly when coordinating multiple WILD Console instances. - Click to begin local logging on the device.
- Click when the experiment is complete.
Expected signs of success
- Recording starts without a parameter or storage error.
- Session duration advances normally.
- The device remains stable through stop.
- Exported files are longer than a trivial test header and have plausible file sizes.
Field Validation
Before a field or multi-animal session, run a short dry run with every WILD device that will be used.
- Connect each device and confirm it reaches the synchronized state.
- Start and stop a short local recording on each device.
- Export the SD card immediately and confirm expected duration, file size, and representative channels.
- Use the release image specified for the experiment and hardware revision.
- For multi-device sessions, repeat the dry run with the planned start order, external I/O wiring, and any camera or TTL sync source attached.
A connected or synchronized GUI state is not proof that data were written for the full intended duration. Treat unexpectedly short files, stalled file-size indicators, unstable offsets, frame drops, or missing channels as blockers before animal recordings.
Live Display
The real-time view supports selected neural previews, auxiliary signals, IMU and DSP states, stimulation triggers, and threshold overlays. See Live Visualization for the runtime preview screenshot and display controls.
Disable preview to save power and BLE bandwidth when live monitoring is not needed. Recover full-resolution recording data from the microSD card after the session.
Download
Insert the SD card and click . WILD Console exports recordings into timestamped folders with neural, auxiliary, ADC, camera, metadata, and parameter files.
Expected signs of success
- Export finishes without stopping at the first folder.
- Core files appear in the export folder:
amplifier.dat,analogin.dat,CE_params.bin. time.datandinfo.rhdare generated by the documented preprocessing path.- Optional
adc.datandmisc.datappear only when audio or camera were enabled.
Normal export does not require the red maintenance buttons. is only for preparing a known empty card, and release-image maintenance is outside the routine recording path.
Common Blockers
| Symptom | First check |
|---|---|
| Device not listed after rescan | Battery, power, BLE discoverability, and whether the expected release image is installed. |
| BLE connects but synchronization never settles | microSD presence, timing wiring, and whether the session is waiting on external sync conditions. |
| Recording starts but export is unexpectedly short | Stop sequence, SD-card write stability, battery stability, and whether the device remained powered through the run. |
| Export folder is missing expected files | Recording mode, whether audio or camera were enabled, and whether preprocessing was run after export. |
| Preview is unstable | Treat preview as optional; confirm local recording first, then revisit BLE preview bandwidth or adapter quality. |